Everyone loves BACON! Well, I know I do. Bet you did not know you could make Wild Hog Bacon did you? Yes, you can!
Today, what I am going to be talking about is, Making Wild Hog Bacon. What I have here is the hindquarter of about a 200lb wild sow. This would be what you would normally make a ham out of, but today I am going to show you how to make bacon out of it. The reason I am able to do this with this wild hog is because it is really fat. You can’t just make bacon out of any wild hog. It needs to be a very fat hog in order to make bacon out of it. As you can see here, this hog is very fat. It has over an inch of fat on it, which makes it perfect for making bacon out of.
Now, I must say here that technically, bacon is made out of the pork belly, or the stomach region of the hog. But that area is just not thick enough on a wild hog to make bacon out of. Domestic hogs, from which bacon is made, are specially bred for this purpose and have much thicker belly flap. This allows bacon to be made from that region of the pig. But at the end of the day, what bacon actually is, is just pork meat that is cured a certain way. The main idea of bacon is simply fat and meat. You need to have a ratio of about 50% fat and 50% meat to make good bacon. So, any part of the pig where you can achieve this 50/50 meat to fat ratio, can be used to make bacon out of.
Making Wild Hog Bacon Stage 1: Shaping the Bacon Slab
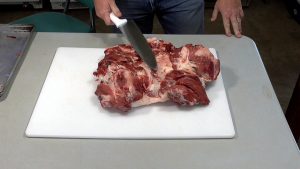
All I have done here is, de-boned the ham (or the hindquarter) of the hog. I have it laid out flat here on my stanton trading cutting board so it is a little hard to tell what it actually is. The first thing I am going to do it cut it in half right down the middle with my Victorinox Cutlery 12-Inch Chef's Knife. The object here is to try to shape it to look like a slab of bacon. Not a slice of bacon, but a slab of bacon from which you cut the slices.
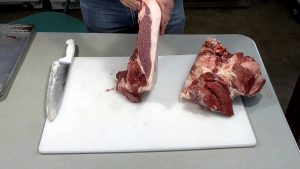
Now that I have cut it in half, let me turn it up on its side here and as you can see, the end piece here looks just like a slice of bacon. Pretty cool, right? I bet you are already starting to get hungry just looking at it. Now I will just trim the slab down to get an even thickness and, I am done. I will also cure the trimmings the same as the slabs. They will be useful for cooking with, for making things like beans and other dishes.
Just to reiterate here, bacon is nothing more than cured pork. It just has a lot more fat in it and it is cured with different ingredients than you would cure just a plain ham with.
Now, you might think that these slabs I have here are a little too big. What you have to keep in mind is that, when you are curing meat, you are extracting most of the water out of the meat, so it is going to shrink in size. The final product is going to much smaller than the fresh slab I have right now.
Making Wild Hog Bacon Stage 2: Mixing the Cure
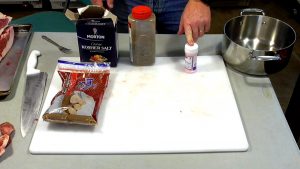
Now that I have trimmed and shaped up the two slabs here, I am ready to start mixing up the cure to get this process on the road. I am going to be using four basic ingredients to cure this bacon today. Here is a list of what I am using.
- Morton Salt Kosher Salt, 3 lbs box
- Bolners Fiesta Curing Salt, 4oz bottle
- C&H, Cane Sugar, Golden Brown, 2lb Bag
- Tone's Spices Restaurant Black Pepper, 18oz bottle
Okay, I will start mixing up the cure here. Depending on how much meat you have to cure, that will determine how much cure you need to mix up. However, do not worry about mixing up too much, because you can always save the left over and use it later. I just put my leftover cure in a freezable container such as these Reditainer Extreme Freeze Deli Food containers, and store it in the freezer.
Because I have about 100lbs a wild hog bacon cure, I am going to mix up the whole 3lb box of Morton Salt Kosher Salt. I will mix in about 2 ounces of pink curing salt. The curing salt is what is going to actually cure the meat and prevent the growth of harmful bacteria and botulism which can kill you, so this is an important part of the cure. Now, I am going to add in some coarse ground black pepper. How much is really dependent on your personally taste. I love black pepper, so I always use a lot, but you can use however much you want.
It is the same thing with the brown sugar, just use however much you want. I need to tell you though, that the more sugar you use, the more sticky the bacon will be when you fry it up, so keep that in mind. For my purpose though I am going to use about 1lb of brown sugar in my mix. I am just going to mix this all up really well here.
This method of curing bacon is referred to as a, Dry Cure. There is also another method of curing bacon, which is referred to as a, Wet Cure. I want to say here that, the method I am showing today is just one way to do it. People have been curing bacon for hundreds of years and I am sure there are hundreds of great ways to do it, that are as good or even better than the way I am showing you today. I learned this method from a good friend that has been making wild hog bacon all his life. All I can say is, it tastes amazing and neither of us have died yet, so it must be a pretty good way to do it. LOL!
Making Wild Hog Bacon Stage 3: Preparing the Bacon Slab for Curing
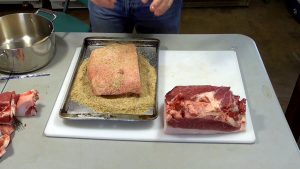
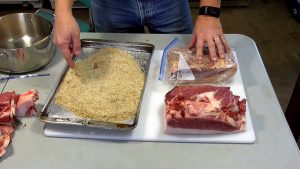
Alright now, here we have the two wild hog bacon slabs I cut earlier and I am getting ready to apply the cure to them. So now, I am going to take some of the cure mixture I made up and pour it out on to this 18 X 12 inch Nordic Commercial Baking Sheet. Then place the slab on the mixture and press down. What you want to do here is try to coat the entire surface of the slab on all sides with the cure. Flip and press the slab on every side until you get a good even coat of cure. If necessary, rub a little cure into the areas that you cannot get to by pressing. That is all there is to it.
Now that we have the slab fully coated with cure, the next thing you need to do is put it into a 1 gallon Zip-Lock style freezer bag. You want to use a bag with a really good seal for this like, a Hefty Slider Freezer Bag, because once the cure starts extracting the water out of the meat and the bag gets filled with juice, you don’t want to bag coming open and spilling out the brine all over your refrigerator. That is a nasty mess to clean up. Plus, you will lose the brine, which is doing the curing for you.
Now, it is important when trying to insert the slab into the bag, that you try not to get any of the cure on the seal of the bag. This will prevent the bag from sealing properly. Make sure you have a moist towel handy to wipe the cure off the seal if you do end up getting some of the cure on the seal. As a precaution, you can fold the top of the bag down like folding a pants leg up. This will place the seal on the outside of the bag and make it less likely that you get any cure on the seal during the insertion process.
After you have the wild hog bacon slab in the bag and you are ready to seal it up, go ahead and close the seal almost all the way, leaving just a tiny bit at the end unsealed. Now, press as much air out of the bag as you can before closing the seal all the way. This important for a couple reasons. First, air contains oxygen, which encourages bacteria growth. Second, leaving air inside the bag will kind of act like a balloon and it could lead to accidental seal rupture during the curing process in the refrigerator.
Making Wild Hog Bacon Stage 4: Curing the Bacon Slab
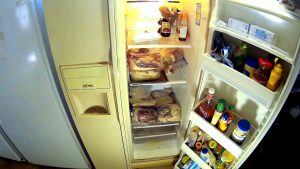
Now that the bacon slabs are coated and packaged, the next thing you need to do is cure them in the refrigerator. This process can take anywhere from three to seven days depending on how thick the slabs are. You need to place the slabs flat on your refrigerator shelf. It is best to place them on baking sheets in case the bag accidentally comes open. This will help prevent a mess. For the next three to seven days, you will need to flip the bag over each day. As the cure extracts water out of the slabs, the bag will become filled with brine. Flipping the bags over each day will baste the slabs with the brine and assure thorough curing of the slabs.
As the slabs become more cured, they meat will become denser and more firm. The color will also change from red to brown. Once the slabs are firm when you squeeze them and have a nice brown color to them (just think about the color of bacon you buy at the store), the slabs are cured and are ready to move on the next stage. This may occur in as little as three days depending on the thickness of the slabs.
Making Wild Hog Bacon Stage 5: Washing and Drying the Bacons for Smoking
Now that the wild hog bacon slabs are now done curing, you could wash them, slice them up and eat them just as they are. However, bacon tastes much better when it is smoked, so that is what we are going to do next.
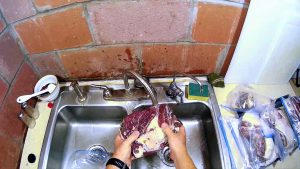
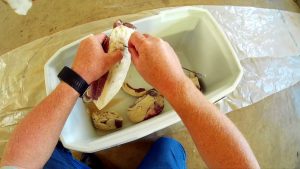
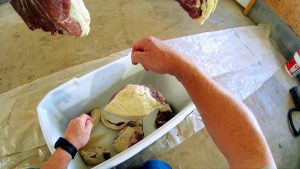
The first thing we need to do is wash the bacon and get all that salty brine off it. The bacon is very salty when finished curing, so now you need to try to reduce that saltiness. So, take the wild hog bacon bacon to the sink and wash it off really well. Next,put it into a bucket or an ice chest full of water to soak for 20 to 30 minutes. This will further help extract some of the salt out of it. Do not worry about taking too much salt out. Believe me, that will never happen.
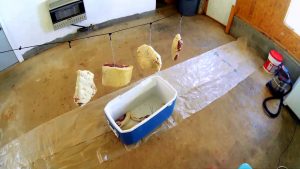
Once the wild hog bacon is finished soaking, you need to be air dry the bacon for a couple days until a sort of film or membrane develops on it. You need to find a cool, dry, dust free environment where you can hang the bacon for a few days. You need a good strong main hanging line to hang it from. I use TOUGH-GRID 750lb Military Spec Paracord to make a clothes line out of. Tie two inch loops in the cord ever 12 inches.
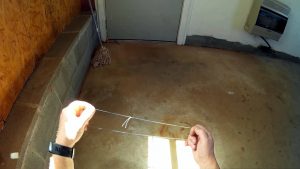
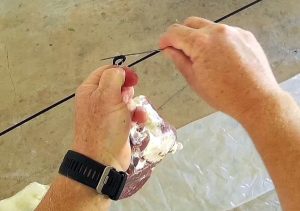
Now, because the wild hog bacon is salty, you cannot use just anything to hang it with. You cannot use plain or galvanized wire, or any other material that is subject to rust, oxidation or corrosion. In this video I am using 30lb Berkley Trilene Big Game Monofilament which works for well for this purpose. Cut the line into one yard lengths and then tie it into a loop using a figure 8 knot. (go to minute 14 of the video to see a demonstration on how to do this).
Once you have your paracord main hanging line up and your monofilament loops made, you need to make a needle to thread the loop lines through the meat. You can make the needle with 12 inches of stiff 16 or 18-gauge wire, preferably made out of stainless steel, such as stainless fishing leader wire. Now bend the wire in half, so that the two ends end up together. Using a pair of hardened tooth wire cutters such as Irwin Cutting Pliers, cut the wire at about a 45 degree angle so that the tip of the wire ends up in a point. Cut the angles so that the points of the both ends of the wire end up on the inside of the needle facing each other.
Now, using the same wire you made the needle out of, you need to make some 3 inch holding pins. Just cut the wire in to 3 inch pins. Make as many as the number of bacon slabs you have to hang. The pins need to be straight.
Now that you have your needle and holding pins made, take one of the monofilament loops you made earlier and thread one edge of the loop in between the two ends of the needle. Then, pick up one of the bacon slabs and, while holding the needle points tightly together, push the needle through one end of the bacon, pulling the monofilament loop half way through.
Now, you should be able to grab the both ends of the loop and hold the bacon up. Next, you need to insert the two ends of the monofilament loop through one of the loops on the main Paracord hanging line.
Now, while holding both of the monofilament loops through the main loop on the paracord line, insert one of the holding pins through both ends of the monofilament loop.
Release the wild hog bacon bacon and it will hang freely.
Now you just have to wait for the wild hog bacon to dry. Dry times will vary greatly depending on temperature and humidity levels. The reason you need to dry them is so that they will take smoke. You might assume that smoking them while they are wet would be preferable, but that is not the case. Think of the wild hog bacon slab as a sponge. If a sponge is already full of water, it cannot soak up any more. If you need to soak up more water with the sponge, you need to squeeze out the water that is in it. The same applies to the bacon. You have to get the water out before it will soak up any smoke.
